
Click on the Manual Refresh from Zoom button and this will trigger the plugin to ping the Zoom server and pull in your most recent Zoom Webinar & Meeting events. Once the page refreshes you will see that the list will be updated with any events that weren’t previously in the list and any recent updates such as event times, title or description changes, etc. you made in your Zoom account.
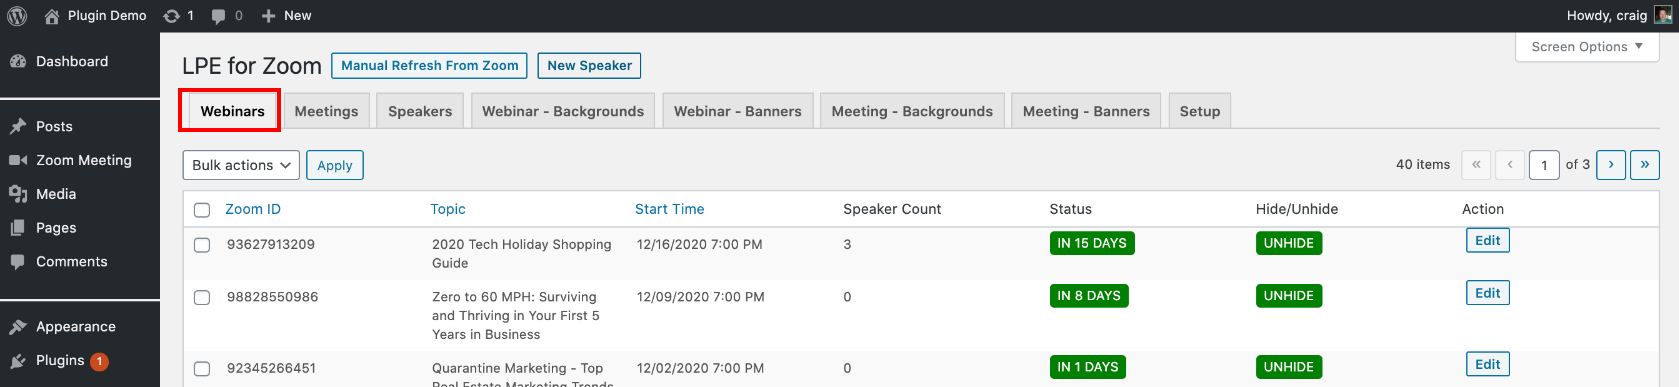
Below the tabs, you will see all your future and prior Webinars based on what was pulled from your Zoom account in Step 1.
Here’s a breakdown of each column:
- Zoom ID: is the event id # assigned by Zoom
- Topic: is the title for the event as it appears in Zoom
- Start Time: Date & Time of the Webinar event as it appears in Zoom.
- Speaker Count: How many speakers assigned for the Webinar event (note this is done from the Webinar edit screen
- Status: Is the Webinar Active/Future (will show the number of days until each event in a green box) or Prior (will show the word COMPLETED in a grey box)
- Hide/Unhide: Do you want to display each Webinar or not display (Hide) it. All Webinars import to display by default. If you wish to hide a specific Webinar (ex. a private event), simply click on the green Unhide button and it will change to display as a red Hide button. Note: this can be reversed at any time.
- Edit: Click on this button to enter the Webinar edit screen to choose the landing page style/layout, add your own custom imagery, choose the speakers, etc.
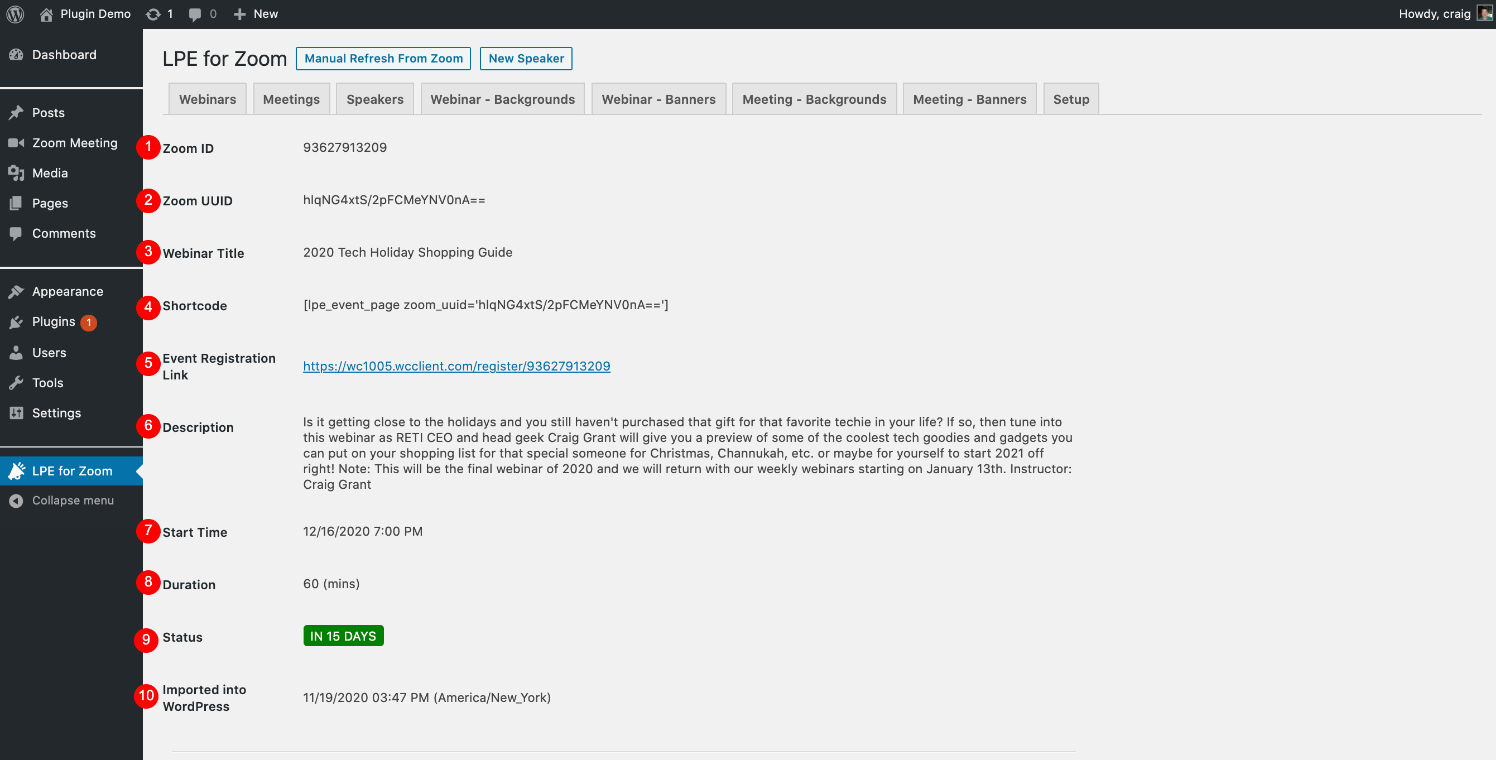
The top part of the Webinar Edit screen provides you all of the details for the Webinar event from Zoom such as the Zoom ID, Zoom UUID, Webinar Title, Description, Start Time, Duration, Status and Date/Time it originally imported into WordPress, plus details generated by the plugin including the Shortcode & Event Registration Link. Here’s a breakdown of each field:
![]() Zoom ID: is the event id # assigned by Zoom
Zoom ID: is the event id # assigned by Zoom
![]() Zoom UUID: is the internal id code provided by Zoom
Zoom UUID: is the internal id code provided by Zoom
![]() Webinar Title: is the title for the event as it appears in Zoom
Webinar Title: is the title for the event as it appears in Zoom
![]() Shortcode: copy and paste this to embed or install it on any page on your site
Shortcode: copy and paste this to embed or install it on any page on your site
![]() Event Registration Link:is a custom URL created by the LPE4Z plugin for the sign up or landing page for this Webinar or event. You can click on it at anytime to preview your changes in another window or tab.
Event Registration Link:is a custom URL created by the LPE4Z plugin for the sign up or landing page for this Webinar or event. You can click on it at anytime to preview your changes in another window or tab.
![]() Description: Event description as it appears in Zoom.
Description: Event description as it appears in Zoom.
![]() Start Time: Date & Time of the Webinar event as it appears in Zoom.
Start Time: Date & Time of the Webinar event as it appears in Zoom.
![]() Duration: Time length of the Webinar event as it appears in Zoom
Duration: Time length of the Webinar event as it appears in Zoom
![]() Status: Is the Webinar Active/Future (will show the number of days until each event in a green box) or Prior (will show the word COMPLETED in a grey box)
Status: Is the Webinar Active/Future (will show the number of days until each event in a green box) or Prior (will show the word COMPLETED in a grey box)
![]() Imported Into WordPress: Date and time the webinar event was originally imported from Zoom into the plugin. Note it does not change when a minor update happens after using the Manual Refresh button/tool.
Imported Into WordPress: Date and time the webinar event was originally imported from Zoom into the plugin. Note it does not change when a minor update happens after using the Manual Refresh button/tool.

The bottom part of the Webinar Edit screen gives you all the options you have to customize or personalize the registration/landing page including choosing your desired layout/style, color scheme, adding your own custom imagery and/or promotional video, etc. Here’s a breakdown of the Customize the Webinar event area:![]() Select the Speakers/Hosts: you can check the boxes of up to 4 people who will be displayed on the webinar event landing page as the Speaker/Host(s). Note: to add new entries, click on the Speakers tab at the top of the screen.
Select the Speakers/Hosts: you can check the boxes of up to 4 people who will be displayed on the webinar event landing page as the Speaker/Host(s). Note: to add new entries, click on the Speakers tab at the top of the screen.
![]() Preview Styles: in this area, you can click on the different style names to view what they look like before deciding to apply them to the webinar event (that is done in the next step).
Preview Styles: in this area, you can click on the different style names to view what they look like before deciding to apply them to the webinar event (that is done in the next step).
- Use the Image Carousel to view what each design style looks like.
- Each time you click on a style name (example London) it will change the preview to the right to that style.
- You can then click on the preview image to view it in full size below the carousel (the page expands to show the full size display).
- You can then click on the x in the top right corner of the display to hide it and revert to the normal page length.
![]() Select a Style & Color: choose from the 2 drop downs the Style and Color scheme you desire for the webinar event.
Select a Style & Color: choose from the 2 drop downs the Style and Color scheme you desire for the webinar event.
Note: Each style is available in all the provided colors allowing you to try out multiple combinations for each event. And both Style and Colors can be changed at anytime.
![]() Background Image:
Background Image:
This is the primary image that will flow to the event header, sign up boxes and/or background depending on which style you choose. You have 2 ways to enter a Background Image:
- Choose File – Browse and upload an image from your own device
- Or click on the Or Choose an Image from the Webinar Background Image Tab to choose an image from your Existing Image Library (images you’ve previously added to the plugin) or from the Pixabay Creative Commons Search tool of creative commons copyright safe images and then assign it to this Meeting (see instructions on that by clicking here)
![]() Select Banner Image or Video: you must select from the dropdown if you want the Banner or Secondary marketing spot to be an image or a video (location differs based on which style you choose).
Select Banner Image or Video: you must select from the dropdown if you want the Banner or Secondary marketing spot to be an image or a video (location differs based on which style you choose).
Once you choose that option, you will then click on the respective Image or Video tab. ![]() If using the Image Tab, follow the same instructions as detailed in item 4 to upload an image from your own device or to Choose an Image from the Webinar Banner Tab.
If using the Image Tab, follow the same instructions as detailed in item 4 to upload an image from your own device or to Choose an Image from the Webinar Banner Tab.

If using the Video tab, you will see the option to enter in a YouTube url.
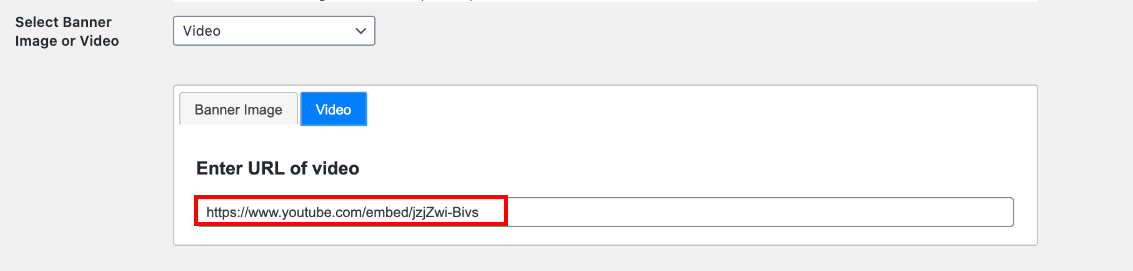
For it to work, you must obtain the link from the YouTube embed code (not the regular shareable link) which you get by doing the following steps:
- View the video on YouTube and click the the Share icon/link below the YouTube player
- Then click on the Embed icon
- Then locate the URL for the video in the Embed Video code block. It will look something like this https://youtube.com/embed/xxxxxxxxx as shown in the following video.
![]() Save: Paste the link into the Enter URL of Video box and click the Save button.
Save: Paste the link into the Enter URL of Video box and click the Save button.
This will save all changes you made during this session and allow you to preview them at the Event Registration Link provided above.


